Rajat
Python Image API using Google Cloud Functions
06 MAR 2020 - 10 MINS
I wanted to display some of the photos I’ve taken on my blog. I didn’t really want an existing Bootstrap gallery component because most of the existing examples were quite tacky and would be quite hard to extend. So, I built out a set of React components which I could nicely display some of my pictures, with a caption and date. The images were fetched over a simple API which randomly chooses an image from a gallery. You can find all the code for this project in this repo.
System Architecture
I’ll start by giving an overview of the whole system and use the rest of the article to go into implementation details.
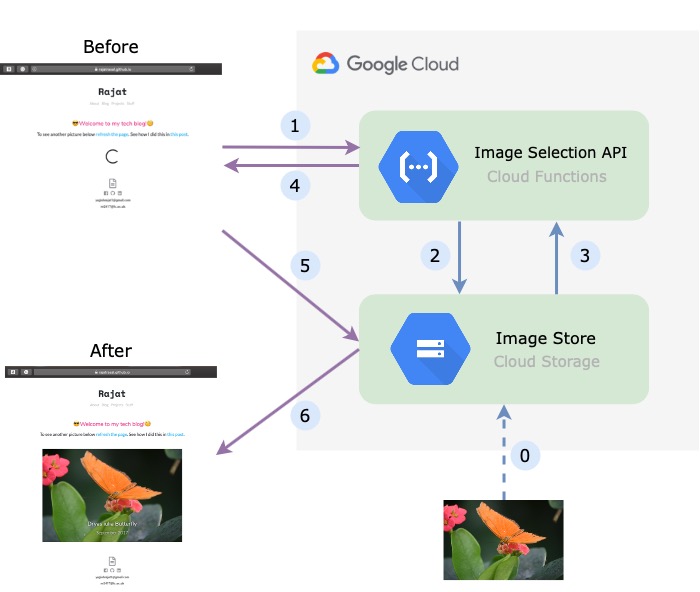
Gallery using GCP Storage Buckets
I manually dragged and dropped each image into a GCP storage bucket. I’ve also included a Python script which automates this process in the project repo.

Google Cloud Functions
I now needed to setup an API which I could use to access an image in the blog-image-gallery bucket. Time for a serverless function! From my experience, the easiest way to deploy a serverless function is using Google’s Cloud Functions. When compared to AWS Lambda, Cloud Functions are far quicker to set up both from the CLI and directly through the online console. GCP’s console also provides far fewers configurable options than AWS, so you can setup a basic Python or Node.js API runtime without needing to read (or understand) swathes of documentation. Since the API is doing such minimal computations, the cost incurred from it over the last year has been negligible.
I wrote a Python Cloud Function choose_image to randomly select an image from the storage bucket. Cloud Functions which use the Python runtime handle HTTP requests through Flask. So all inputs to Cloud Functions are therefore Flask HTTP requests and all outputs should be Flask HTTP responses. For this reason, I also included a small Flask app in the project repo server.py to easily test the cloud functions’ functionality. Deployed Cloud Functions are authorised to access most other GCP services without any further authentication. This means we have access to our storage bucket off-the-bat. For local runs however, we will need an API key (steps for this are included in the project repo).
from Flask import jsonify, abort
from google.cloud import storage

storage_client = storage.Client()

def choose_image(request):
    if request.method == 'GET':
        bucket = 'blog-image-gallery'
        images = list(storage_client.list_blobs(bucket))
        image = random.choice(images)
        image_url = f'https://storage.cloud.google.com/{bucket}/{image.name}'

        response = jsonify(image_url)
        return response
    else:
        # request forbidden
        return abort(403)
We deploy choose_image from the command line. Talk about how an instance of the function is evaluated each time but the globals are not reloaded unless we redeploy. Workers are automatically scaled up and down based on load. https://cloud.google.com/functions/docs/bestpractices/tips
- Write Makefiles for project
Frontend
Testing
Unittests with Flask testing Integration tests between cloud functions and storage with shim Frontend tests with shim
- Write tests for frontend and backend
TL;DR
Who says you need Instagram when you have cloud storage buckets and serverless functions :P
Any details about how to use or set up API keys, storage buckets or cloud functions can be found in the GCP documentation. I have included all the steps needed to set up the project in the Makefile in the project repo.
References
- Efficiency for Cloud Function deployment https://cloud.google.com/functions/docs/bestpractices/tips
- WSGI for Web Developers (Ryan Wilson-Perkin) - https://www.youtube.com/watch?v=WqrCnVAkLIo
Did you enjoy this post?
If you did, check out my Github repo - I've got some cool projects on there. I also post these articles on Medium, so you could get notifications when they get posted if you download the Medium app and subscribe to my feed. Alternatively you could even subscribe to my feed on this site and get notified by my updates here. Add me on social media too. It's quite possible that you didn't like this article. I'd love some feedback!